We use cookies to make your experience better. To comply with the new e-Privacy directive, we need to ask for your consent to set the cookies. Learn more.
Router Safety
Introduction to Safety
Using basic common sense, as well (of course) as following formal regulation, is at the heart of all safe woodworking practices. However, with routing you need to couple this realistic approach to an understanding of the obvious physical dangers from the machine, its cutters and the workpiece, as well as the less apparent risks to health such as noise and dust.
Although it is easy to take safety for granted, with routers many of the dangers are more exaggerated because the cutting tool is hand-held and very much closer to you. It produces a lot of noise and dust and there are often exposed cutters spinning so fast you can hardly see them. However, protecting yourself from potential danger is simple and when used correctly, the router is quite safe.
Most accidents are down to operator error, but you must stay alert and be prepared for any eventuality. At 28,000 rpm accidents can happen fast! Safety issues can be divided into a number of categories, some of which affect you directly like noise and dust. Others are less clearly defined such as safe workholding, feed direction and router maintenance. Only key safety issues will be covered in detail in this section, the others are discussed in their relevant chapters elsewhere Knowledge Base.

Personal protection and health
Many of these dangers are obvious and quickly countered by even the least safety conscious router user. Nevertheless, it is worth considering them in some detail so you can decide on your own strategy to minimise any health dangers.


Respiratory protection
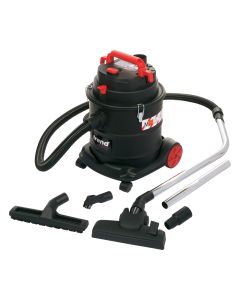
Dust is another danger that is cumulative and doesn’t display any major symptoms until the damage has been done. Fortunately there is a wide range of masks, shields and powered extraction helmets that offer varying levels of protection. You can find trends range here (link)The action of the router tends to generate clouds of dust as well as the more obvious chippings, but it is this really fine dust that does the damage to your health. It builds up in your lungs and the introduction of more toxic materials like MDF has exacerbated the problem. The Health and Safety Executive classifies all wood dusts as toxic and possibly harmful, particularly with prolonged exposure. It is therefore essential to protect against these dangers, even when dust extraction is fitted to the router itself. Unfortunately, in the case of dust, the level of protection is reflected in the amount you are prepared to spend on protection. It is tempting to penny pinch, but remember that continued good health has no price. At the very least, you must always wear a simple dust mask of some sort.
The best dust protection is provided by an air fed helmet. These battery operated masks feed a stream of clean filtered air down over your face, giving almost total dust protection. They are very close fitting, even if you wear glasses or have a beard and the visor is impact resistant as well, so there is no need for additional goggles or safety glasses. It is claimed that particles down to 1 micron are filtered out by these helmets. They provide excellent protection from the inhalation of dust via the fine dust filters. In addition, the visor protects your face from flying debris and the quiet and lightweight fan motor ensures the helmet is comfortable to wear for long periods.


Eye protection
Eyes, your most precious asset, must be protected at all times. Normally the risk is minimal, just from flying chips or dust but there is potential for a cutter to break - and you are then presented with a situation where impact protection is vital as well. Loose knots in the wood are another potential danger as they can be scooped up and thrown out violently by the spinning cutter. The options for eye protection are goggles, safety glasses or a face shield. Safety glasses are most comfortable and if you already wear glasses you can have a safety version made up to your existing prescription by your optician. Goggles are a bit more cumbersome and can impair all-round vision, but they can be used over existing glasses if need be. Visors are another alternative as they give better general head protection and sit well off your face. The type which flip up are best as you can lift them out of the way when you are not actually routing or if you need to take a closer look at something.

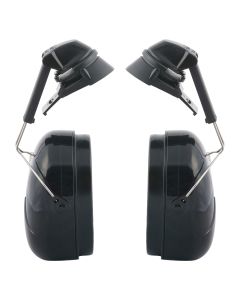
Hearing protection
It is generally recognised that exposure to noise above 80 decibels can cause permanent damage to your hearing. As most routers operate at over 100 decibels it is essential that some form of ear defenders are used, usually in the form of spring loaded muffs or conventional earplugs. As neither of these is particularly comfortable to wear you have to be really disciplined about using them and always keep them handy. Remember, that hearing damage happens gradually and usually only becomes apparent when it is too late.

Clothing
It is also important to wear the right sort of clothing in the workshop and proper footwear is a good starting point. It is very easy to drop a piece of material on your foot particularly when both hands are holding the router. Fine dust on the floor can also make it slippery so non-skid shoes or work boots with built-in toe protection are always recommended. The rest of your clothing should be of the close fitting type preferably with no pockets, as these soon fill up with sawdust. A zip front smock with a rear pocket is ideal as there are no loose bits flapping about that can get caught in either the machine or the work. Remember that your sleeves are very close to both, so elasticated cuffs are better, otherwise roll up your sleeves. Being able to take off you overall before leaving the workshop is the best way to confine all the mess to one place.
Workshop Safety
As well as protecting yourself personally, you also need to take some precautions with regard to workshop safety. Often, the area where you have to work is not a dedicated workshop. It may have to be shared with the washing machine or the kid’s bikes, so it is even more important to observe some basic safety precautions.

For a start you need the work area to be well lit and preferably by daylight. If it is not, a mixture of tungsten and fluorescent lights is usually sufficient provided there is plenty of it. You need to be able to see clearly what you are doing. You also need a good power supply and the more sockets you have the better, so you can then plug in where the cable is least likely to cause a trip hazard. Avoid overloading sockets by using lots of multiple adaptors.

Always check that the workpiece is held really firmly and work on a suitable bench at a comfortable height. Although you can protect yourself from the noise, remember that others around you probably can’t, so give some consideration to your neighbours if you have lots of routing to do, particularly if you have to do it outside. Proper insulation to the workshop is a good investment as it will minimise noise transmission as well as keeping you warm. Keep a well stocked first aid kit handy to deal with minor cuts and bruises, and if you work alone always ensure you have a phone to summon help in the unlikely event of a more serious injury.

Piles of shavings and chippings are also a fire hazard and removing this debris will also minimise the time spent searching for cutters or tools that might end up in the accumulated rubbish. Give any routing job your full concentration at all times, particularly as you come to the end of a cut and automatically tend to relax. Make sure you are not going to be interrupted and try to prevent other people distracting you. Allow plenty of time to finish the job. Many accidents are caused by rushing or taking short cuts and certainly don’t use a router if you are tired or ill.

Whatever the type of electrical installation in the workshop, do make sure it is routed through an RCD circuit breaker to provide protection in the event of a fault, or if you accidentally cut the cable. The workspace area also needs to be as clear as possible, as it is so easy to stumble over offcuts of timber or half finished work. Tidy up on a regular basis removing waste and debris.
Always make sure you unplug the router before changing cutters. Switches can easily be knocked on accidentally and the consequences don’t bear thinking about when you are handling the cutter. Also make sure the switch is ‘off’ before you plug in again. Even in a small workshop you may have a dozen or more power tools, often with several plugged in at once, so it is important to label each plug to make sure you pull out the right one. Never unplug by pulling on the lead.

If you can arrange it, some overhead sockets are excellent for minimising trailing cables. This works even better if you can install a few hooks in the ceiling to loop the cable over and keep it well out of the way. To avoid getting tangled up if you are making circular cuts around a workpiece, make a dummy run first before you actually switch on. This will also show if you can make the cut in one easy pass. If you have to keep stopping to change your stance or position, the cut will show small burn marks, so if possible find a working position that allows one smooth movement.
Check that plugs are fitted with the right sized fuse. Most power tools are adequately protected by a 5 or 13 amp fuse, which is usually fitted in the moulded plug supplied on the tool. If for any reason you need to change this plug, fit a fuse that is correctly rated to suit the power of the tool.

Much has already been said about protecting yourself from the effects of dust, but you can do a lot by trying to catch the dust at source and preventing it spreading out into the workshop. Most router manufacturers have started to address the problem and have developed clip-on dust spouts or shields designed to be used in conjunction with a vacuum extractor. The problem with many of these spouts is that they can restrict both the visibility and access to the cutter. Some are better than others but there is a trade off here between effectiveness and ease of use.

To collect the dust, you need a vacuum unit and the choice is quite extensive. The answer for connecting to power tools is a high pressure low volume collector, HPLV, which works on the same principle as a domestic vacuum cleaner. In fact, you could use the home vacuum for small amounts of work but they tend to be noisy, have limited power to extract dust adequately and are not really meant for continuous use.
The other type of extractor is the high volume low pressure type commonly used for machines that generate large amounts of waste such as planers and sawbenches.

The worst ones are so inconvenient that you end up dispensing with them; not what was intended. Similarly, if you have to remove the spout every time you change the cutter it becomes very tedious. Also bear in mind that Acrylic hoods may be fine when they are new, but with only a little use the static build up is such that fine dust sticks all over it and you cannot then see what you are doing. The other problem with ‘on board extraction’ is that the addition of the hose from the extractor can make the router cumbersome and more difficult to balance. Extraction spouts that exit vertically rather than horizontally are a far better option, particularly if you can rig up an overhead support for the hose.

The other type of extractor is the high volume low pressure type commonly used for machines that generate large amounts of waste such as planers and sawbenches
These work on a different principle and are not actually good at dealing with fine dust, as they tend to just blow it back out into the workshop through the top filter bag. They also have big diameter hoses, but don’t be tempted to try and reduce their outlets to connect up to power tools. This does not increase the suction as you would think, but actually greatly reduces it. The answer is to buy a dedicated workshop vacuum extractor that is designed for just this purpose. They usually come with a collection of connectors that allow you to hook up to a variety of different tools, as well as using them for conventional cleaning up. They are totally enclosed and incorporate multi stage filtration that is effective down to a particle size of less than one micron. Although such a system is very effective, you have to remember to switch the extractor on every time you use the router, which can get tedious if there are lots of cuts. To overcome this snag, the better ones feature ‘auto start’, which allows you to plug the tool directly into the vacuum. With these, the vacuum then kicks in automatically when you switch on the tool and switches off again when you switch off the tool, but they have a time delay that will keep it running for a few seconds after you have switched off to clear the spout and hose.

With these, the vacuum then kicks in automatically when you switch on the tool and switches off again when you switch off the tool, but they have a time delay that will keep it running for a few seconds after you have switched off to clear the spout and hose.
These extractors are generally more powerful and quieter than their domestic equivalents, and the hose is longer and more flexible making it easier to handle. A few of the more expensive routers feature built-in extraction hoods, which are obviously far less intrusive. Although these still need to be connected to an extractor, the waste is taken up through the body of the machine.
Remember that the effectiveness of the extraction may be compromised by fitting attachments like the side-fence or guide bushes. These may block the suction path, though some manufacturers have tried to minimise the effects by making guide bushes skeletal rather than solid. There are some extraction hoods that mount on the fence bars and these are a good solution for straight forward edging work, but they are not suitable for any other cuts, as the hood gets in the way.

Extraction from a router table is much more straight forward. The fence assembly usually incorporates an outlet spout which does not need to move so you can make a really positive connection to it. Although this will remove a lot of the waste, there is always some that drops down into the router casing, so spend a few minutes sucking it all out occasionally.
Unfortunately, no matter what form of extraction is adopted, it will never be totally effective and should be used in addition to the personal protection strategies already described. As a final measure, you might like to consider installing an ambient air filter. These self-contained units usually hang up on the ceiling, cleaning the whole workshop environment.
Operated by a remote control, they make an amazing difference to the air quality and minimise that layer of fine and dangerous dust that accumulates on all the workshop shelves. The temptation is to remove your personal dust protection when you finish a cut, when in fact the fine dust stays in the air for some hours. An ambient air filter is cheap to run and maintain, working silently in the background, a must for the serious woodworker.
Safety checklist
Although many of the following precautions have already been discussed, or are explored in more detail in other chapters, it is as well to reiterate a basic safety checklist. The features are in no particular order and the list is not exhaustive, but it should help you maintain a safe routing environment.
- Remember that a router is a power tool and should be treated with respect so read the user manual, stay alert and don’t work if you are tired.
- Take all the necessary personal protection precautions.
- Always unplug the router when changing cutters or accessories and make sure it is switched off before plugging back in.
- Only use good quality bits that are kept sharp and clean and properly fitted into the collet.
- Make sure the work is securely clamped in place before you approach it with the router.
- Never try to rout small pieces unless they are clamped or held in a suitable jig.
- Always make deep cuts in a series of shallower passes.
- As you prepare the timber cut some spare stock for making test cuts to check cutter settings.
- Remember that some electric tools spark, so don’t use them near flammable solvents.
10. Don’t use the router in wet conditions.
11. Don’t contact the wood until the router has reached full speed and always feed in the correct direction.
12. Tighten up all locking knobs before you start and make sure that their anti-vibration springs are in place.
13. Leave bits to cool down before removing them from the collet. Check the collet regularly for dirt and wear.
14. Don’t overload low powered routers with heavy cuts or with large diameter bits and match the rotation speed accordingly if the router has variable speed.
15. Where possible, use an extractor to minimise swarf build up that can affect the cut.
16. Cutters are sharp and may require handling with gloves if they become stuck in the collet or when removing them from the manufacturer’s protective wax covering.
17. Use only quality cutters and ideally those conforming to Holz BG or the new EN standard. This guarantees that they have been thoroughly tested and have appropriate chip limiting features.
18. Always select the shortest possible length of cutter that will do the job and if there is a choice pick the largest shank diameter. Make sure the collet capacity matches the bit diameter perfectly.
19. If you are not retracting the cutter after a cut, wait until it stops before you put it down and ideally place the router on a block to protect both you and the cutter.
20. When the router is not in use put it away on a shelf or preferably in a cupboard to prevent shavings and dust falling into the top motor grille.