We use cookies to make your experience better. To comply with the new e-Privacy directive, we need to ask for your consent to set the cookies. Learn more.
THE FIXED ROUTER
The workshop value of the router is unquestionable, but its superb versatility can be increased even further by mounting it underneath a table or in an overhead stand.
Hand Vs fixed
This arrangement effectively turns your router into a small spindle moulder, with all that entails in the way of greater precision, control and safety.
It also allows much larger and more complex cutters to be used, like the profile scribing and panel raising range of tooling.
The router table is perhaps the next most useful purchase after the router itself and even the occasional user will benefit from its extra capabilities.
However, there are other ways of mounting the router in a fixed position, either in an overhead stand or in a machining centre of some sort.
There are of course advantages and disadvantages to each particular method of using the router and you will have to assess the best method for each job as it arises.

Hand Routing
Advantages:
- Ideal for machining large workpieces
- Inexpensive
- Increased flexibility
- Ideal for drilling and countersinking
Disadvantages:
- Difficult to machine small workpieces
- Easy to make mistakes by poor handling
- Operator fatigue on large runs
- Harder to set up for accurate work.
- Unsuitable for heavy cuts
Router Table
Advantages:
- Good support for narrow workpieces
- Increase range of available moulds from a single cutter
- Quicker to set up jigs and guides
- More suitable for production work
- Ideal for copy profiling
- More stable when using large cutters
- Increased safety with small workpieces
- Dust extraction is more effective
Disadvantages:
- Poor access to change cutters
- More difficult to adjust cutting height
- Poor vision for grooving and panelling
- Dust and debris falls into the router body
Overhead Stand
Advantages:
- Excellent vision of cutting area, particularly with small pieces
- Good access for cutter changing
- Ideal for template profiling and drilling
Disadvantages:
- Limited throat for large workpieces
- Effective guarding is more difficult
- Access for mounting hold down clamps is limited
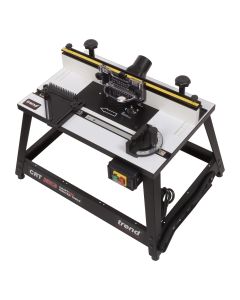
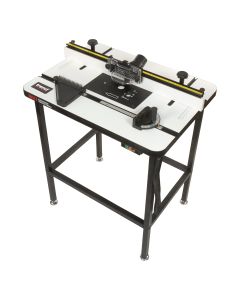
The Router Table
A basic router table consists of a support table, some form of router mounting plate and a straight fence.

A basic router table consists of a support table, some form of router mounting plate and a straight fence.
The table can be floor standing on its own legs, or it can be mounted on a low stand to house the router for clamping onto the work bench. Proprietary tables vary in construction from heavy cast iron affairs to light plastic mouldings .

All have their place, but you will find that the router table soon becomes an invaluable piece of kit, being used far more than you originally anticipated, so think ahead and buy in some spare capacity.
Make sure it is stable enough when you start pushing large pieces through it and if necessary, bolt it down to a false base, which can be firmly clamped.
The Table Top

The tops on most proprietary router tables are either aluminium or steel. However, sheet materials such as MDF and dense particleboard are generally adequate enough if you want to make your own
top.
Plastic laminate faced board, with a balancing laminate on the reverse side to prevent bowing, is particularly suitable, being both stable and having a low friction surface. It is also inexpensive (off-cuts of kitchen work top are ideal), easy to work and therefore suitable for making your own table. Whatever the material you use, the top needs to be flat, level and smooth with a longitudinal slot to take a sliding mitre guide.

The central hole in the table should be capable of taking insert rings of different diameters to reduce the size of the hole for smaller diameter cutters.
This ensures maximum support at the cutting edge, reduces vibration and hence improves the cut finish. It also minimises the chance of the leading edge of the workpiece snagging in the cutter opening.
The size of router table you choose will mainly depend on the type of work you envisage using it for. Ideally, one around 800 x 600mm (32 x 24 inches) will accommodate most types of furniture and small joinery items. There needs to be enough support so that the workpiece cannot drop or tilt as it is fed into, or leaves the cutter.

For wide or long workpieces, extra support can be provided in the way of a temporary side extension table or in/out-feed rollers.
The table should also be grooved to accommodate a mitre guide, or even better, some form of sliding table or fence.
If you are involved with miniature work, such as dolls houses, there are dedicated model maker router tables available.
These incorporate all the features of their bigger counterparts, but their small size and precise engineering ensure the necessary high precision for working tiny timber sections.
If there is no mitre guide available you can still guide the work by using a homemade sled running against the back fence.

Mounting the Router
Every router table seems to have its own unique method of mounting the actual router, using a variety of holding mechanisms, which often include specifically drilled screw holes to suit a particular model.

All these methods are inevitably fiddly to set up and you sometimes end up leaving a router permanently mounted under the table, it’s just too much effort to remove it.

However, with the Trend T11 router and the PRT table, we have seen the introduction
of a quick release system that allows the router to be mounted and dismounted very quickly, eliminating the need for an expensive router dedicated solely to table use.
One of the benefits of having a table with a thin metal top is to avoid losing too much depth of cut. Wood based tops tend to be much thicker, with up to 3/4” depth of cut being lost if the router is mounted on the surface. With these thicker tops it is therefore necessary to recess the router base into the thickness of the board, rather than to simply bolt it beneath.

An alternative method is to cut a hole through the table, larger than the router, and then mount the router on a metal plate inset, flush with the table surface. Some tables incorporate levelling nuts or shims to ensure that the plate can be set flush with the table surface.
If all else fails and there is not enough reach, the router spindle can be extended with a collet extension but this does introduce the likelihood of increased vibration and consequent poorer finish from the cutter.
Table Fence
To act as a guide for the workpiece, the table needs a rigid back fence that is also adjustable.

Sometimes, it needs to be set a specific distance from the cutter, but at other times it has to be moved to allow the centreline of the cutter to be set back behind the face of the fence, so a good range of movement is essential.

Fence adjustment is ideally carried out using threaded knobs with captive bolts running in slots in either the fence base or the table itself. Alternatively, the fence can be simply clamped to the table at each end. Because the router cutter is spinning on a vertical axis (unlike a sawbench with a horizontal arbor), there is no blade face to which the fence can be set parallel.

However, it is worth trying to set it parallel to the table edge to allow work-holders, and other jigs and guides to be set up easily.

Adjustable faces, like those fitted to the side-fences on portable routers, allow the ends to be closed up to the cutter for maximum support.
The table fence should also be fitted with a dust extraction port, which should be positioned directly behind the cutter recess for effective dust removal. For ultimate extraction efficiency, a Y junction hose should be used, with one hose mounted on the router base port and the other behind the projecting cutter.

Ideally, the two halves of the fence should be independently adjustable in and out as well as fore and aft. This allows you to make full face mouldings or edge plane, where fine-tuning of the out-feed face is necessary to maintain support.

If both fences are permanently fixed inline, this offset can only be achieved by fitting a thin shim or thicker false face to the out- feed fence.
Similarly, a shaped facing can be fitted over the out-feed face when cutting full width edge mouldings.
Guards and Hold-Downs
As with all cutting machinery, adequate guarding must be fitted to prevent accidents.

Ideally, the guard should prevent any part of your hand from getting close to the rotating cutter, but the more protection the better, provided it doesn’t interfere with your vision or restrict safe holding of the workpiece.
With most table fences the dust extraction hood forms a guard to the back of the cutter. However, the exposed cutter in front of the fence must also be guarded somehow at the start and end of each pass.

The most common method is to fit hold- down clamps or pressure guards.
These not only guard the cutter but also prevent the workpiece lifting from the table surface.

Side pressure guards serve the same purpose, protecting the cutter from the side and additionally holding the work securely against the fence faces.
Where pressure guards are inappropriate, alternative guarding can be purpose made to fit over the cutter. It can be secured to the table fence or a separate rigid bracket.

Transparent guards should only be made from shatter proof plastics such as polycarbonate.
Pressure guards may vary from the very elaborate with screw tensioners, to simple featherboards.

For certain operations, particularly with small section material, it is better to make up a tunnel guard which completely encloses both the cutter and the work to ensure a perfectly chatter free finish.
Switching
To avoid the dangers of reaching under the table to switch the router on and off, it needs to be operated via a remote switch fixed to the front (in-feed) end of the table.

No-volt release switches are best suited for this purpose, ideally incorporating an easy to reach knock-off switch to cut the power in an emergency.

If your router is one of the new type with a ‘dead mans’ switch you will need to use some form of cover to hold it in the ‘on’ position, so you can then operate it via the NVR switch.
Router Controls
As the plunge action is not required for most operations when using the router inverted, a fine depth adjuster can be fitted to allow precise setting of the cutter height above the table.

This precision is virtually impossible without a fine adjuster and if you have not already bought one with your router certainly get one with the table.

Some tables allow the fitting of a quick raising device which is a great aid, but the Trend T11 router and PRT table allows the router to be raised from the top of the table, a huge benefit only appreciated by those who have previously struggled to make fine adjustments to stubborn and inaccessible table set-ups!
Using the Router Table
Although generally easy and safe to use, there are a few techniques that will enhance your router table operation. For a start, the table must be at a comfortable height, which is usually higher than normal bench height to avoid too much bending and stooping.

Feed the timber over the table smoothly and continuously to avoid the inevitable burn marks if you hesitate or stop. Try standing to the right hand side of the table with the left hand holding the stock against the fence, with the right hand one doing the feeding in one long flowing movement.
Because it is easier than using the router by hand, the temptation is to force the wood past the cutter too quickly, so determine a steady feed rate that allows the cutter to work properly and clear the chips without burning or chattering.

Make sure the work is held firmly, either by you or some form of hold down clamp and only take light passes.
Finally, remember that as with hand routing, the finished cut will only be as good as your initial stock preparation, in fact it is probably more important to use quality stock on the router table as distorted material will not slide easily past the fences or through the hold downs.
Working Safely on the Inverted Router Table
1) For all table routing operations, the full depth of cut should be reached in a series of shallow steps rather than in a single pass. As with hand held routing, the depth of each step will depend on the size of the cutter, shank diameter, cutter profile and router power. Just because the router is firmly mounted don’t assume it will take heavier cuts.

2) With the router inverted, the cutter is rotating in an anti-clockwise direction. Therefore the feed direction must be from right to left, working from the front of the table against the rotation of the cutter. Do not run the full width of the material between the cutter and fence, or the cutter will grab the work with great force.

3) Always make edge cuts with the cutter set into the slot in the fence and the edge being machined against the fence face. Never run the material in the opposite direction, i.e. from left to right. If there is a choice, always use the cutter working underneath the timber rather than on top, as any distortion in the wood may cause it to jam and kickback.

4) If you need to make several passes to widen a groove, take care not to trap the workpiece i.e. adjust the fence so that the bit is cutting on the safe side of the initial cut, this ensures the cutting action pushes the work back against the fence.

Ten Essential Steps to Setting up the Router Table
A router table may be very simple to use but it does require setting up carefully to maximise its accuracy and safety.
1) A router table may be very simple to use but it does require setting up carefully to maximise its accuracy and safety.
2) Ensure it is disconnected from the power supply before inserting the cutter well into the collet. Don’t try and get extra reach by getting the collet to grip the end end of the shank. Try to get at least three quarters of it into the collet and ideally up to the ‘K’ line mark on the cutter shank.
3) Fit the smallest possible insert ring to close the gap around the cutter, but spin it by hand to check that it is still clear.
4) Set the fence to give the required width of cut, then bring the sliding faces in close to the cutter. But make sure they are then locked up tight to prevent them sliding into the revolving cutter when you feed the wood against them.
5) Set the depth of cut remembering that several shallow cuts will always produce a better finish than one heavy one.
6) Check that the router speed is appropriate for the diameter of the cutter, as this is vital with very large diameter cutters.
7) Adjust the hold downs and guards to suit the workpiece dimensions.
8) Plug in the router and connect up to a dust extractor if possible.
9) Start the router and let it run up to the selected speed before starting the cut.
10) Think safety. Ear defenders and eye protection are essential and consider using a powered respirator for ultimate protection. Always use push sticks and safeguard your hands.
Overhead Router Stands
The other way of mounting the router in a fixed position is in an overhead stand.

The main advantage of this set-up is that the cutter always remains plainly visible and the waste material is easily cleared by the cutter, rather than being trapped underneath, which sometimes happens when you are using a router table. It is also very much easier to access and change the cutters.There are however some disadvantages.
Firstly, the entire bit is exposed abovethe table and is often difficult to guard adequately. Secondly, dust extraction hoods are less easy to arrange around the cutter without it getting in the way.
Extra care also needs to be taken with some hand feeding operations such as internal corner cuts, where the cutter can sometimes grab even when it is being fed correctly. Lastly, the table must be kept scrupulously clean, as just a couple of chippings under the work will affect the cutting depth.
Professional overhead routing stands have now largely been superseded by the CNC type of machine. However, second hand ones are still available and their unique plunge action head, operated via a foot pedal, leaves your hands free to control the workpiece. This makes them ideal for repetition work.
The overhead router lends itself particularly well to producing circular objects. With a pivot point set directly into the support table you can quickly shape platters, wall plaques and discs at some speed and with considerable accuracy.

There are not many proprietary stands available for use by the home craftsman, but some drill stands can be converted to take the small light duty round bodied routers. These have rather limited depth of cut adjustment compared with a professional set-up, so any operations carried out on these stands are usually fed from the edge rather than plunge cut.
If you are mounting a standard routerwith its base above the work, the cutter is normally guarded by the router’s baseplate. However, with light duty routers that can be separated from the baseplate, a separate guard must be fitted.
Remember that the cutter rotation in this mode is opposite to that of the inverted table so when you are feeding across the table, the feed direction must be from left to right.
A horizontal clamp or featherboard can be fitted to hold the material firmly against the fence and this can be fitted in a similar way to that used on a router table. However because of the position of the router, vertical hold down clamps need to be positioned either side of the router.
CNC Routing

The ultimate in router machining is a CNC machine where the path of the router is controlled by computer. Designed for the industrial user, these machines incorporate all the basic principles of the overhead router but allow fast and precise cutting of intricate shapes with complete repeatability every time.
These machines are available in a range of sizes, with the smaller ones being ideal for school or training purposes. These use standard routers as the cutting head, whereas the heavier duty industrial machines use a high frequency motor unit that is quieter, longer lasting and better suited to continuous use.
Long life Polycrystalline diamond coated cutters are often needed to help minimise costly ‘down time’. A range of CAD software is available for either 2 or 3D cutting and modelling, covering applications such as moulding, light engineering in non ferrous metals, plastic engineering, sign making and 3D carving.
CNC mini machine
This is the latest desktop miniature engraving machine for 2D and 3D engravings. It can use images from digital photos, CAD drawings, computer generated art programs or scanned images. This is a Small lightweight desktop model with micro switch safety cover for safe operation, making it ideal for education. It works with any PC computer running Windows XP or newer and it includes a simple software package.